Sunday 27 January 2013

Sketching lesson 3 -Getting things in proportion


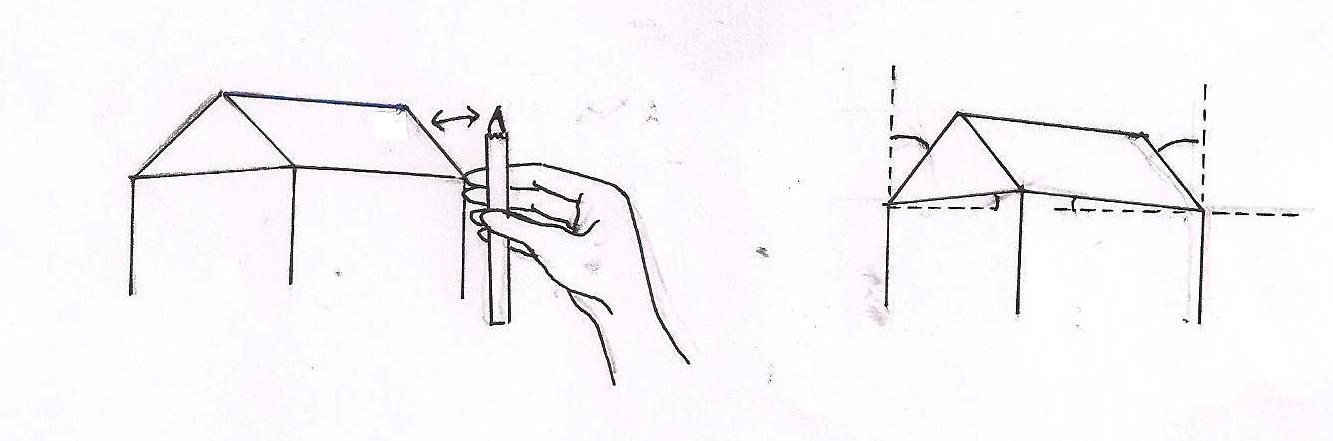
Top Art Tip 3 - Check sizes and proportions by holding your pencil out at arm's length, closing one eye and lining up the top of your pencil with the top of a medium-sized object in the still life, landscape, figure or whatever. Keep your pencil lined up with this and then-

move your thumb to line up with the bottom of that object. KEEPING YOUR THUMB IN PLACE, turn your hand around to use that measurement against other parts of the thing you are drawing. You may discover that the bottle is three times its width, or the head goes into the body 6 times , that sort of thing.

Use this knowledge - but not those same exact sizes marked  by your thumb on your pencil - to get your actual drawing in proportion.

E.g. this vase is 4 apples high, and 1 apple wide. 


Sketching lesson 2 - Those pesky angles!

 Top Art Tip 2: A great way of checking angles is to hold up your pencil horizontally or vertically against the photo, still life, figure or landscape you are drawing. This helps you to judge the angle against the pencil. If necessary, lightly draw a horizontal or vertical line on your drawing and then the line at the correct angle.


If you are drawing from a photo, use the horizontal and vertical edges of the photo to judge angles against.

Sketching Lesson 1 - SIMPLIFY!

On my blog you will be finding tips and tricks for drawing and painting. These are the distillation of a lifetime of courses, classes, books, DVDS,  self-tuition, and weekly practice!

1) Let's start with sketching for beginners - the basis for all realistic drawing and painting. 

Where to begin? Whether you are drawing from a photo or from reality, you must SIMPLIFY. 

Top Art Tip 1: Place and rough in the main forms first - then they are easily corrected if you decide they're the wrong shape or in the wrong place. DO NOT draw any detail until the main shapes are in.


In the above initial sketches, the main shapes and angles are roughed in. So left to right, notice 


  1. In a box shape, the angles of the walls and roof. ( Verticals always stay vertical.)
  2. The oval of the cat's body.( and the little triangle of her eyes and nose.)
  3. Again, the sleeping cat's body appears oval.
  4. My cat sleeping on her back appears to have a triangular or actually pyramid-shaped head.
  5. The sunflower simplified is an oval turned into a bowl by a curved line below.


My current work, snow, January 2013

In the watercolours course which I am teaching we are painting snow scenes, inspired by the current British weather - we get very little snow where I live in Spain and visually we miss it!        ( though not the difficulty of travelling in it. Our sympathy is with you. ) 

We have painted snow scenes loosely and more accurately. In my work I do strive for looseness but with my Graphics and Fine Art training I tend to want to draw accurately. To blend both is not easy, which is why my painting heroes are the ones who acheived this so very well: Edgar Degas, Claude Monet, Berthe Morisot, Joaquin Sorolla and John Singer Sergeant.

Top Art Tip 4 - keep drawing and painting! You'll keep improving with practice...

Recent snow scenes: 


Red deer taking shelter in a snowstorm

The red deer herd in a snowstorm

Red deer stag in Highland sunshine


Dawn, Chamonix

Snowy silver birches

Snowy walk at sunset